
บน Ubuntu Server รุ่นใหม่ (18.04 ขึ้นไปจนถึง 25.10) ระบบเครือข่ายจะถูกจัดการด้วยเครื่องมือชื่อ Netplan ซึ่งใช้ไฟล์รูปแบบ YAML (.yaml) ในการกำหนดค่าต่าง ๆ เช่น
- IP Address
- Gateway
- DNS Server
- DHCP
การตั้งค่า Static IP เป็นสิ่งสำคัญสำหรับงาน Server Administration เช่น
- Web Server
- Database Server
- Docker Host
- Monitoring Server
- IoT Gateway
เพราะบริการเหล่านี้ต้องมี IP Address คงที่ เพื่อให้เครื่องอื่นเชื่อมต่อได้เสมอ
บทความนี้จะแนะนำการตั้งค่า Static IP ด้วย Netplan บน Ubuntu Server 25.10 แบบ Step-by-Step
พื้นฐานที่ต้องมี (Prerequisites)
ก่อนเริ่มควรมีข้อมูลดังนี้
| รายการ | ตัวอย่าง |
|---|---|
| Network Interface | ens33 |
| IP Address | 192.168.1.50 |
| Subnet | /24 |
| Gateway | 192.168.1.1 |
| DNS | 8.8.8.8, 1.1.1.1 |
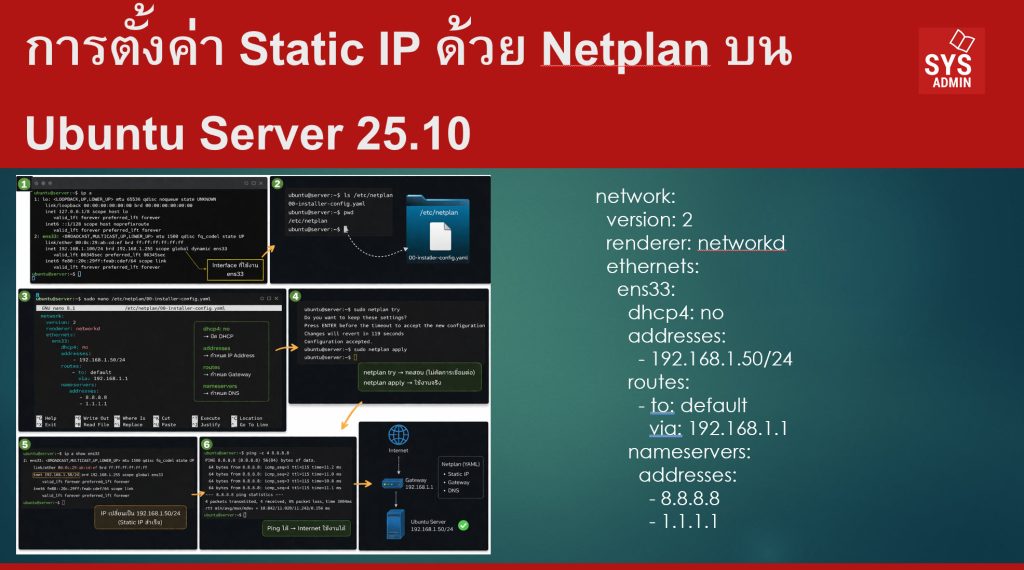
ตรวจสอบ ชื่อ Network Interface
1. ตรวจสอบไฟล์ Netplan
ไฟล์ configuration จะอยู่ที่
ตรวจสอบไฟล์
ตัวอย่าง
2. แก้ไขไฟล์ Netplan
เปิดไฟล์ด้วย nano
ตัวอย่างไฟล์สำหรับ Static IP
| network: version: 2 renderer: networkd ethernets: ens33: dhcp4: no addresses: – 192.168.1.50/24 routes: – to: default via: 192.168.1.1 nameservers: addresses: – 8.8.8.8 – 1.1.1.1 |
อธิบายแต่ละส่วน
| Parameter | ความหมาย |
|---|---|
| network | เริ่มต้น config |
| version | เวอร์ชันของ Netplan |
| renderer | ตัวจัดการ network (networkd สำหรับ server) |
| ethernets | กำหนด interface |
| dhcp4 | ปิด DHCP |
| addresses | IP Address |
| routes | Gateway |
| nameservers | DNS |
3. ตรวจสอบ Syntax ก่อน Apply
ก่อนใช้งานควรตรวจสอบ configuration
4. Apply การตั้งค่า
เมื่อมั่นใจว่า config ถูกต้อง
5. ตรวจสอบ IP ใหม่
ตรวจสอบ IP
หรือ
ตัวอย่างผลลัพธ์
6. ทดสอบ Network
ทดสอบ Internet
หรือ
ถ้า ping ได้ แสดงว่าการตั้งค่า Static IP สำเร็จ
ปัญหาที่พบบ่อย (Troubleshooting)
1. YAML indentation ผิด
ไฟล์ YAML ต้องเว้นวรรคให้ถูกต้อง
ตัวอย่างผิด
ตัวอย่างถูก
2. Interface ผิด
ตรวจสอบด้วย
ชื่อ interface อาจเป็น
enp0s3
3. Gateway ไม่ถูก
ตรวจสอบ Gateway ของ network เช่น
สรุป
การตั้งค่า Static IP ด้วย Netplan บน Ubuntu Server 25.10 ทำได้ไม่ยาก โดยมีขั้นตอนหลักดังนี้
- ตรวจสอบ Network Interface (
ip a) - แก้ไขไฟล์
/etc/netplan/*.yaml - กำหนด IP, Gateway, DNS
- ตรวจสอบ config ด้วย
netplan try - ใช้งานด้วย
netplan apply
เมื่อเข้าใจ Netplan แล้ว การบริหารเครือข่ายบน Ubuntu Server จะง่ายขึ้นมาก และสามารถนำไปใช้กับงานจริง เช่น
- Web Server
- Docker Host
- Kubernetes Node
- IoT Server
- Monitoring Server
—
Write by SysAdmin Knowledge
https://www.sysadmin.in.th
April 3, 2026