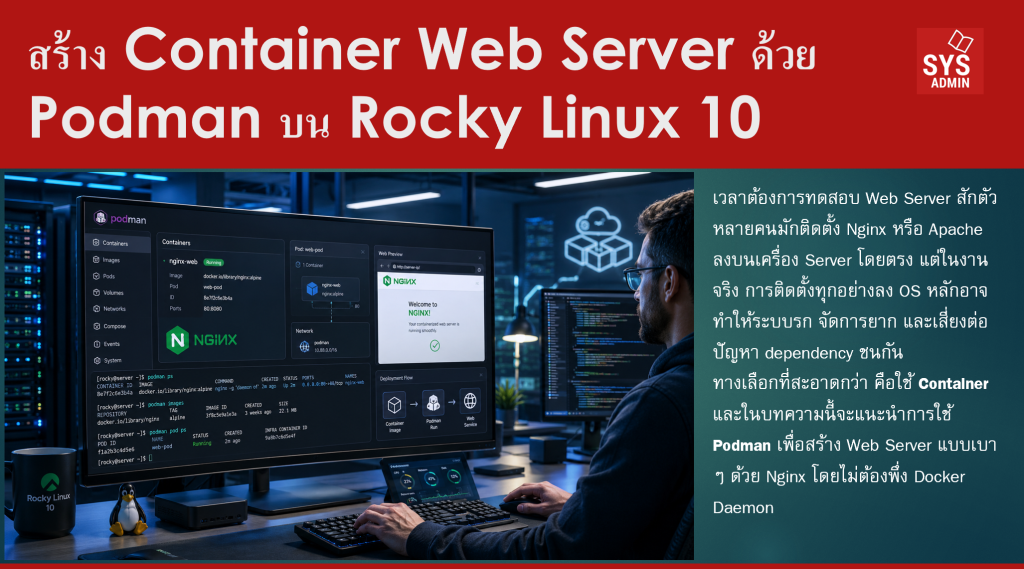

อยากเปิดเว็บเล็ก ๆ โดยไม่ต้องติดตั้ง Nginx ลงเครื่องตรง ๆ?
เวลาต้องการทดสอบ Web Server สักตัว หลายคนมักติดตั้ง Nginx หรือ Apache ลงบนเครื่อง Server โดยตรง แต่ในงานจริง การติดตั้งทุกอย่างลง OS หลักอาจทำให้ระบบรก จัดการยาก และเสี่ยงต่อปัญหา dependency ชนกัน
ทางเลือกที่สะอาดกว่า คือใช้ Container และในบทความนี้เราจะใช้ Podman เพื่อสร้าง Web Server แบบเบา ๆ ด้วย Nginx โดยไม่ต้องพึ่ง Docker Daemon
Podman เป็นเครื่องมือจัดการ container และ image ที่รองรับมาตรฐาน OCI และสามารถใช้งานได้ทั้งแบบ rootless และ rootful ซึ่งเหมาะมากกับงาน Linux Server สมัยใหม่ โดยเฉพาะฝั่ง RHEL/Rocky Linux
บทความนี้จะได้เรียนรู้อะไร
ในบทความนี้เราจะทำ Web Server ด้วย Podman แบบ step-by-step โดยใช้ Nginx Container เป็นตัวอย่าง เนื้อหาครอบคลุมตั้งแต่การติดตั้ง Podman, สร้างไฟล์เว็บ, run container, map port, เปิด firewall, ตรวจสอบ log และตั้งค่าให้ container ทำงานอัตโนมัติหลัง reboot ด้วย Quadlet
ตัวอย่างนี้เหมาะกับผู้เริ่มต้นที่ต้องการเข้าใจ container แบบใช้งานจริง และเหมาะสำหรับ SysAdmin ที่ต้องการ deploy เว็บ static, landing page, internal documentation หรือหน้า maintenance page แบบเร็ว ๆ
Environment ที่ใช้ทดสอบ
-
OS: Rocky Linux 10.x
-
Container Engine: Podman 5.x/6.x
-
Web Server Image:
docker.io/library/nginx:stable-alpine -
Mode: Rootless Podman
-
Port ที่ใช้ทดสอบ:
8080 -
User: ผู้ใช้ทั่วไปที่มีสิทธิ์
sudo
หมายเหตุ: ในตัวอย่างนี้ใช้ port
8080แทน port80เพราะ rootless container โดยปกติไม่สามารถ bind port ที่ต่ำกว่า1024ได้ หากไม่ได้ปรับค่า kernel เพิ่มเติม
พื้นฐานที่จำเป็นก่อนเริ่ม
ก่อนทำตามบทความนี้ ควรมีสิ่งต่อไปนี้
-
Rocky Linux 10 ที่เชื่อมต่อ Internet ได้
-
User ที่ใช้คำสั่ง
sudoได้ -
เข้าใจคำสั่ง Linux พื้นฐาน เช่น
mkdir,nano,curl,systemctl -
เปิดใช้งาน
firewalldหากต้องการให้เครื่องอื่นเข้ามาทดสอบผ่าน network
ตรวจสอบเวอร์ชัน OS ก่อน
cat /etc/rocky-release
ตรวจสอบ user ปัจจุบัน
whoami1. ติดตั้ง Podman บน Rocky Linux 10
Rocky Linux มีเอกสารแนะนำการติดตั้ง Podman ด้วย dnf install podman โดยตรงจาก repository ของระบบ
sudo dnf -y update

# ติดตั้ง Podman
sudo dnf -y install podman
ตรวจสอบเวอร์ชัน Podman
podman --version
ตรวจสอบข้อมูลระบบของ Podman
podman info
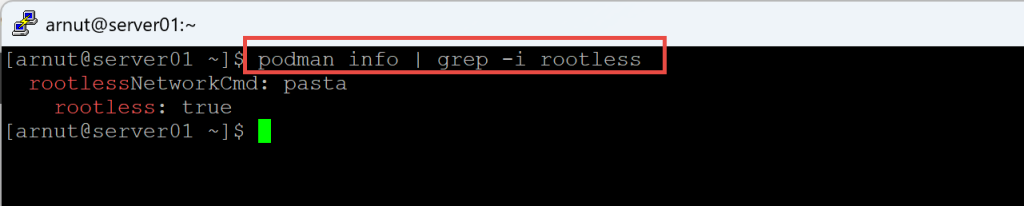
ตรวจสอบว่าใช้งานแบบ rootless หรือไม่
podman info | grep -i rootless
ถ้าแสดงค่า rootless: true หมายความว่ากำลังใช้งาน Podman ด้วย user ปกติ ไม่ใช่ root
2. สร้างโฟลเดอร์สำหรับ Web Content
เราจะสร้าง directory สำหรับเก็บไฟล์เว็บไซต์ไว้ใน home directory ของ user ปัจจุบัน
mkdir -p ~/podman-web/html
สร้างไฟล์ index.html
cat > ~/podman-web/html/index.html <<'EOF'
<!DOCTYPE html>
<html lang="th">
<head>
  <meta charset="UTF-8">
  <title>Podman Web Server</title>
  <style>
    body {
      font-family: sans-serif;
      background: #111827;
      color: #f9fafb;
      text-align: center;
      padding-top: 80px;
    }
    .box {
      max-width: 700px;
      margin: auto;
      background: #1f2937;
      padding: 40px;
      border-radius: 16px;
    }
    h1 {
      color: #38bdf8;
    }
  </style>
</head>
<body>
  <div class="box">
    <h1>สวัสดีจาก Podman Container</h1>
    <p>Web Server นี้ทำงานด้วย Nginx บน Podman</p>
    <p>ทดสอบบน Rocky Linux 10</p>
  </div>
</body>
</html>
EOF
ตรวจสอบไฟล์
ls -lah ~/podman-web/html
cat ~/podman-web/html/index.html
Screenshot แนะนำ: แสดงไฟล์
index.htmlใน terminal หรือเปิดด้วย editor
3. Pull Nginx Image
Nginx เป็น Web Server และ Reverse Proxy ที่นิยมมาก ตัวอย่างนี้ใช้ official image จาก Docker Hub ซึ่งมีการใช้งานแพร่หลายสำหรับรันเว็บผ่าน container
podman pull docker.io/library/nginx:stable-alpine
ตรวจสอบ image ที่ดาวน์โหลดมา
podman images
ตัวอย่าง output ที่ควรเห็น
REPOSITORY                TAG            IMAGE ID      CREATED       SIZE
docker.io/library/nginx   stable-alpine  xxxxxxxxxxxx  xx days ago   xx MB
4. Run Container Web Server
ตอนนี้เราจะสร้าง container ชื่อ web01 โดย map port จากเครื่อง host 8080 ไปยัง port 80 ใน container
podman run -d \
  --name web01 \
  -p 8080:80 \
  -v ~/podman-web/html:/usr/share/nginx/html:Z \
  docker.io/library/nginx:stable-alpine
อธิบายคำสั่งสำคัญ
-d
# ให้ container ทำงานแบบ background

--name web01
# ตั้งชื่อ container เป็น web01 เพื่อจัดการง่าย

-p 8080:80
# map port 8080 ของ host ไปยัง port 80 ของ container

-v ~/podman-web/html:/usr/share/nginx/html:Z
# mount ไฟล์เว็บจาก host เข้าไปยัง document root ของ Nginx
# :Z ใช้สำหรับปรับ SELinux label ให้ container เข้าถึงไฟล์ได้อย่างถูกต้อง
ในระบบที่เปิด SELinux เช่น Rocky Linux การ mount directory จาก host เข้า container ควรใส่ :Z สำหรับ volume ที่ใช้กับ container เดียว เพราะ Podman จะ relabel ไฟล์ให้เหมาะกับ container context; ถ้าไม่ใส่ อาจเจอปัญหา permission denied แม้ permission ของไฟล์จะดูถูกต้องแล้วก็ตาม
5. ตรวจสอบสถานะ Container
ตรวจสอบว่า container ทำงานอยู่หรือไม่
podman ps
ดู log ของ container
podman logs web01
ตรวจสอบ process ภายใน container
podman top web01
ตรวจสอบ port mapping
podman port web01
ควรเห็นผลลัพธ์ประมาณนี้
80/tcp -> 0.0.0.0:8080
6. ทดสอบ Web Server จากเครื่อง Server
ใช้ curl ทดสอบจากเครื่องเดียวกัน
curl http://127.0.0.1:8080
ถ้าทำงานถูกต้อง ควรเห็น HTML ที่เราสร้างไว้
ทดสอบดูเฉพาะ HTTP Header
curl -I http://127.0.0.1:8080
ตัวอย่างผลลัพธ์
HTTP/1.1 200 OK
Server: nginx
Content-Type: text/html
ตรวจสอบเวอร์ชัน Nginx ภายใน container
podman exec web01 nginx -v
7. เปิด Firewall ให้เครื่องอื่นเข้าถึงได้
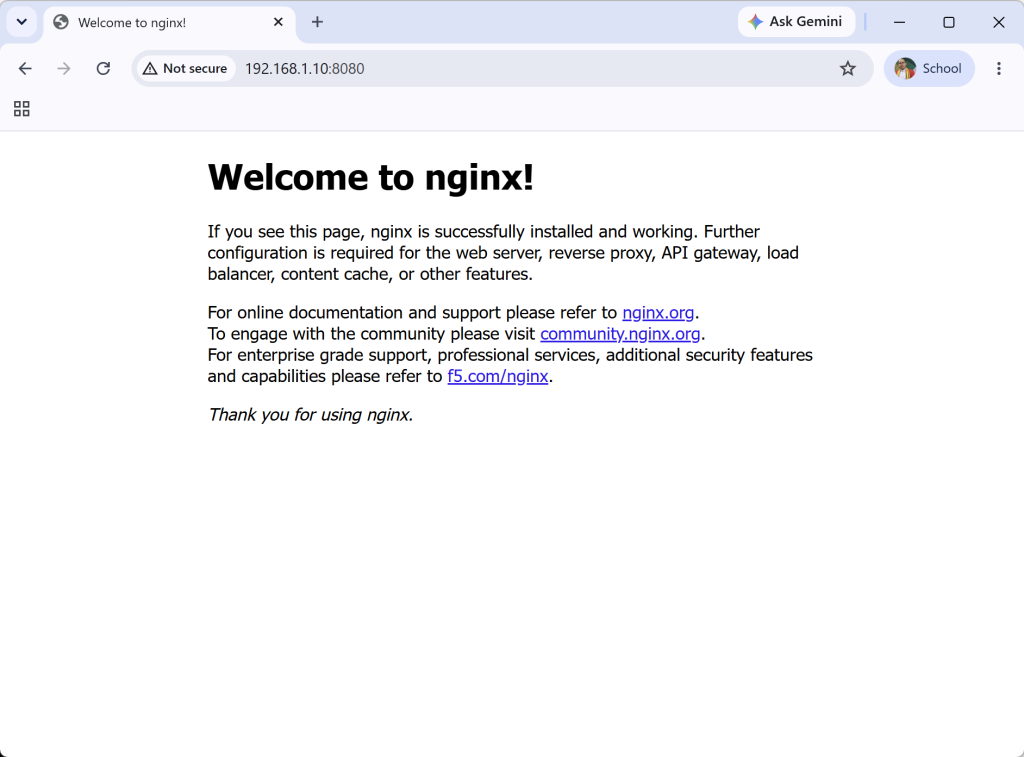
ถ้าต้องการให้เครื่องอื่นใน network เข้าถึง Web Server ผ่าน port 8080 ต้องเปิด firewall เพิ่ม
⚠️ คำเตือน: เปิดเฉพาะ port ที่จำเป็นเท่านั้น และควรจำกัด network access เพิ่มเติมหากเป็น production server
# เปิด port 8080/tcp แบบถาวร
sudo firewall-cmd --add-port=8080/tcp --permanent

# reload firewall เพื่อให้ rule มีผล
sudo firewall-cmd --reload

# ตรวจสอบ port ที่เปิดอยู่
sudo firewall-cmd --list-ports
ทดสอบจากเครื่องอื่นในวง LAN
curl http://SERVER-IP:8080
หรือเปิด browser ไปที่
http://SERVER-IP:8080
8. แก้ไขหน้าเว็บโดยไม่ต้องสร้าง Container ใหม่
เพราะเรา mount directory จาก host เข้า container แล้ว หากต้องการแก้หน้าเว็บ ให้แก้ไฟล์บน host ได้ทันที
nano ~/podman-web/html/index.html
จากนั้น refresh browser อีกครั้ง
สำหรับ static file ของ Nginx ส่วนใหญ่ไม่จำเป็นต้อง restart container เว้นแต่มีการเปลี่ยน config ของ Nginx เอง
9. หยุด เริ่ม และลบ Container
หยุด container
podman stop web01
เริ่ม container อีกครั้ง
podman start web01
restart container
podman restart web01
ลบ container
podman stop web01
podman rm web01
ลบ image ถ้าไม่ต้องการใช้งานต่อ
podman rmi docker.io/library/nginx:stable-alpine
⚠️ คำเตือน: คำสั่ง podman rmi จะลบ image ออกจากเครื่อง หากมี container อื่นใช้งาน image เดียวกันอยู่ อาจลบไม่ได้จนกว่าจะลบ container ที่เกี่ยวข้องก่อน
10. ตั้งค่าให้ Web Server Start อัตโนมัติด้วย Quadlet
ในงาน production หรือ lab ที่ต้องการให้ container กลับมาทำงานเองหลัง reboot ควรให้ systemd เป็นตัวจัดการ lifecycle
ปัจจุบันเอกสาร Podman ระบุว่า podman generate systemd ถูกทำเครื่องหมาย deprecated แล้ว และแนะนำให้ใช้ Quadlet สำหรับรัน container หรือ pod ภายใต้ systemd แทน
Quadlet คือแนวทาง declarative สำหรับให้ Podman สร้าง systemd service จากไฟล์ .container, .volume, .network และไฟล์ที่เกี่ยวข้อง โดยรองรับทั้ง rootful และ rootless systemd unit
ก่อนทำ Quadlet ให้ลบ container เดิมก่อน เพื่อป้องกันชื่อชนกัน
podman stop web01
podman rm web01
สร้าง directory สำหรับ rootless Quadlet
mkdir -p ~/.config/containers/systemd
สร้างไฟล์ web01.container
cat > ~/.config/containers/systemd/web01.container <<'EOF'
[Unit]
Description=Rootless Nginx Web Server with Podman
After=network-online.target
Wants=network-online.target

[Container]
Image=docker.io/library/nginx:stable-alpine
ContainerName=web01
PublishPort=8080:80
Volume=%h/podman-web/html:/usr/share/nginx/html:Z

[Service]
Restart=always
TimeoutStartSec=900

[Install]
WantedBy=default.target
EOF
สั่งให้ systemd user reload unit
systemctl --user daemon-reload
เปิดใช้งาน service
systemctl --user enable --now web01.service
ตรวจสอบสถานะ
systemctl --user status web01.service --no-pager
ทดสอบ Web Server อีกครั้ง
curl http://127.0.0.1:8080
11. ทำให้ Rootless Service ทำงานหลัง Reboot
สำหรับ rootless systemd service หากต้องการให้ทำงานแม้ user ไม่ได้ login ควรเปิด linger ให้ user นั้น
sudo loginctl enable-linger $USER
ตรวจสอบ
loginctl show-user $USER | grep Linger
ควรเห็น
Linger=yes
จากนั้น reboot เพื่อทดสอบ
sudo reboot
หลังเครื่องกลับมา ให้ตรวจสอบ service
systemctl --user status web01.service --no-pager
curl http://127.0.0.1:8080
Screenshot แนะนำ: หน้าจอ
systemctl --user status web01.serviceที่แสดงสถานะactive (running)
12. Troubleshooting ที่พบบ่อย
ปัญหา: เข้าเว็บไม่ได้จากเครื่องอื่น
ตรวจสอบว่า container ทำงานอยู่
podman ps
ตรวจสอบ firewall
sudo firewall-cmd --list-ports
ตรวจสอบว่า port 8080 เปิดอยู่หรือไม่
ss -tulnp | grep 8080
ปัญหา: curl localhost ได้ แต่เครื่องอื่นเข้าไม่ได้
สาเหตุที่พบบ่อยคือ firewall ยังไม่เปิด port หรือ network ของ VM ตั้งเป็น NAT ที่ยังไม่ได้ forward port
ถ้าใช้ VirtualBox ให้ตรวจสอบ network mode เช่น
-
Bridged Adapter: เครื่องอื่นใน LAN เข้าถึง VM ได้ง่ายกว่า
-
NAT: ต้องทำ Port Forwarding เพิ่ม
-
Host-only: เข้าได้เฉพาะ host กับ VM
ปัญหา: Permission denied ตอน mount ไฟล์เว็บ
ตรวจสอบว่าใส่ :Z แล้วหรือยัง
podman inspect web01 | grep -i mount -A 20
ถ้ายังไม่ได้ใส่ :Z ให้ลบ container แล้วสร้างใหม่
podman stop web01
podman rm web01

podman run -d \
  --name web01 \
  -p 8080:80 \
  -v ~/podman-web/html:/usr/share/nginx/html:Z \
  docker.io/library/nginx:stable-alpine
ปัญหา: ใช้ port 80 แล้ว error
ถ้าใช้ rootless Podman แล้วสั่งแบบนี้
podman run -d --name web01 -p 80:80 docker.io/library/nginx:stable-alpine
อาจเจอ error เพราะ port ต่ำกว่า 1024 เป็น privileged port สำหรับ Linux โดยค่าเริ่มต้น วิธีที่ง่ายและปลอดภัยสำหรับ lab คือใช้ port 8080 ก่อน
-p 8080:80
สำหรับ production แนะนำให้ใช้ reverse proxy, firewall port forwarding หรือออกแบบ network ให้เหมาะสม แทนการลด security policy ของระบบโดยไม่จำเป็น
13. แนวทางใช้งานจริงต่อยอด
หลังจากทำ Web Server ด้วย Podman ได้แล้ว สามารถต่อยอดได้หลายทาง เช่น
-
ใช้ Nginx Container เป็น static website server
-
ใช้เป็นหน้า maintenance page ขององค์กร
-
ทำ reverse proxy ไปยัง container อื่น
-
ใช้ร่วมกับ Caddy หรือ Traefik สำหรับ HTTPS
-
ใช้ Quadlet จัดการหลาย container แบบ systemd-native
-
ทำ image เองด้วย Containerfile
-
ใช้ Podman ร่วมกับ GitHub Actions หรือ CI/CD pipeline
สำหรับ production จริง ควรเพิ่มหัวข้อด้าน security เช่น HTTPS, non-root image, read-only volume, resource limit, log rotation และ monitoring
สรุป
Podman เป็นเครื่องมือที่เหมาะมากสำหรับ SysAdmin ที่ต้องการใช้งาน container บน Linux Server โดยเฉพาะสาย Rocky Linux/RHEL เพราะติดตั้งง่าย ใช้งานแบบ rootless ได้ และเชื่อมกับ systemd ได้ดีผ่าน Quadlet
ในบทความนี้เราได้สร้าง Web Server ด้วย Nginx Container ตั้งแต่สร้างไฟล์เว็บ, run container, map port, เปิด firewall, ตรวจสอบการทำงาน และตั้งค่าให้เริ่มอัตโนมัติหลัง reboot ด้วย systemd user service
จุดสำคัญที่ควรจำคือ ใช้ rootless เป็นค่าเริ่มต้น, ใช้ port มากกว่า 1024 สำหรับ lab, ใส่ :Z เมื่อ bind mount บนระบบที่ใช้ SELinux และใช้ Quadlet แทนการ generate systemd unit แบบเก่า
—
Write by Dr.Arnut Ruttanatirakul
SysAdmin Knowledge
https://www.sysadmin.in.th
July 7, 2026