
เริ่มต้นใช้งาน Docker บน Ubuntu 24.04 ฉบับผู้ดูแลระบบมือใหม่
Docker คือแพลตฟอร์มโอเพนซอร์สที่ช่วยให้การพัฒนา และรันแอปพลิเคชันในรูปแบบของคอนเทนเนอร์ (Container) เป็นไปอย่างรวดเร็วและมีประสิทธิภาพ ด้วยความสามารถในการแยกแอปพลิเคชันออกจากระบบปฏิบัติการ ทำให้ Docker กลายเป็นเครื่องมือยอดนิยมในโลกของ DevOps, Cloud และการพัฒนาแอปพลิเคชันสมัยใหม่ ในบทความนี้เราจะพาไปเรียนรู้ขั้นตอนการติดตั้ง Docker เวอร์ชันล่าสุดบน Ubuntu Server 24.04 LTS ซึ่งเป็นระบบปฏิบัติการรุ่นใหม่ที่ได้รับการปรับปรุงด้านประสิทธิภาพและความปลอดภัย
คุณสมบัติหลักของ Docker
-
เบาและรวดเร็ว: คอนเทนเนอร์ใช้ทรัพยากรร่วมกับ OS ทำให้เบากว่า VM และสตาร์ตได้เร็ว
-
รันได้ทุกที่: สร้างแอปบนเครื่องหนึ่ง แล้วสามารถย้ายไปรันบนอีกเครื่องหนึ่งได้โดยไม่ต้องกังวลเรื่อง dependency
-
การแยกส่วน: แอปแต่ละตัวรันในคอนเทนเนอร์ของตัวเอง แยกจากกันอย่างอิสระ
- ทำงานร่วมกับ DevOps ได้ดี: ใช้ร่วมกับระบบ CI/CD, Kubernetes และ Infrastructure as Code ได้อย่างลื่นไหล
ตัวอย่างการใช้งาน Docker
-
นักพัฒนาสามารถสร้าง environment สำหรับแอปในเครื่องตัวเอง แล้วส่งให้ทีม QA และ Production ใช้งานต่อได้แบบเหมือนกันกับต้นฉบับ
-
ใช้รันแอปพลิเคชันหลายตัวในเครื่องเดียวกัน เช่น Web server, Database, Redis แต่ละตัวอยู่ในคอนเทนเนอร์ของตัวเอง
องค์ประกอบหลักของ Docker
-
Docker Engine: ซอฟต์แวร์หลักที่ใช้รันคอนเทนเนอร์
-
Docker CLI: เครื่องมือบรรทัดคำสั่งสำหรับควบคุม Docker
-
Dockerfile: ไฟล์ที่ใช้ระบุวิธีสร้าง image ของแอป
-
Docker Compose: เครื่องมือสำหรับจัดการหลายคอนเทนเนอร์พร้อมกัน
ขั้นตอนการติดตั้ง Docker บน Ubuntu Server 24.04
1. อัปเดตแพ็กเกจระบบ
ก่อนเริ่มติดตั้ง ให้ทำการอัปเดตแพ็กเกจในระบบให้เป็นเวอร์ชันล่าสุด
2. ติดตั้งแพ็กเกจ
3. ติดตั้ง Docker
4. เปิดใช้งาน
sudo systemctl enable –now docker
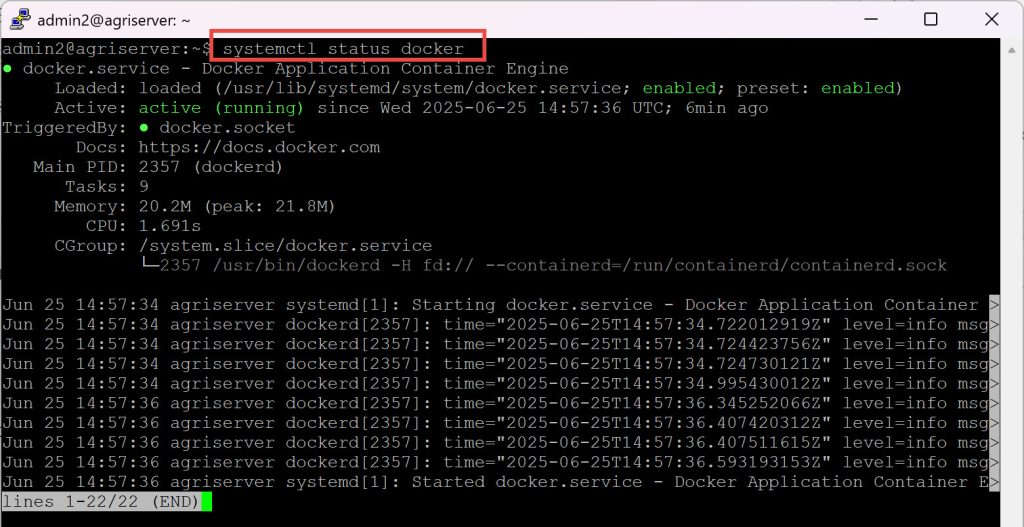
5.ตรวจสอบสถานะ
systemctl status docker
6. สร้างกลุ่มผู้ใช้ docker กรณียังไม่มี (ตรวจสอบ cat /etc/group)
groupadd docker
7. เพิ่มผู้ใช้เข้าในกลุ่ม Docker
sudo usermod -aG docker $USER
8.ตรวจสอบเวอร์ชั่น
sudo docker –version
ผลลัพธ์
Docker version 27.5.1, build 27.5.1-0ubuntu3~24.04.2
การทดสอบ Test Docker installation
sudo su – $USER
sudo docker run hello-world
ผลลัพธ์
|
Unable to find image ‘hello-world:latest’ locally Hello from Docker! To generate this message, Docker took the following steps: To try something more ambitious, you can run an Ubuntu container with: Share images, automate workflows, and more with a free Docker ID: For more examples and ideas, visit: |
คำสั่ง Docker พื้นฐาน
docker [OPTIONS] command
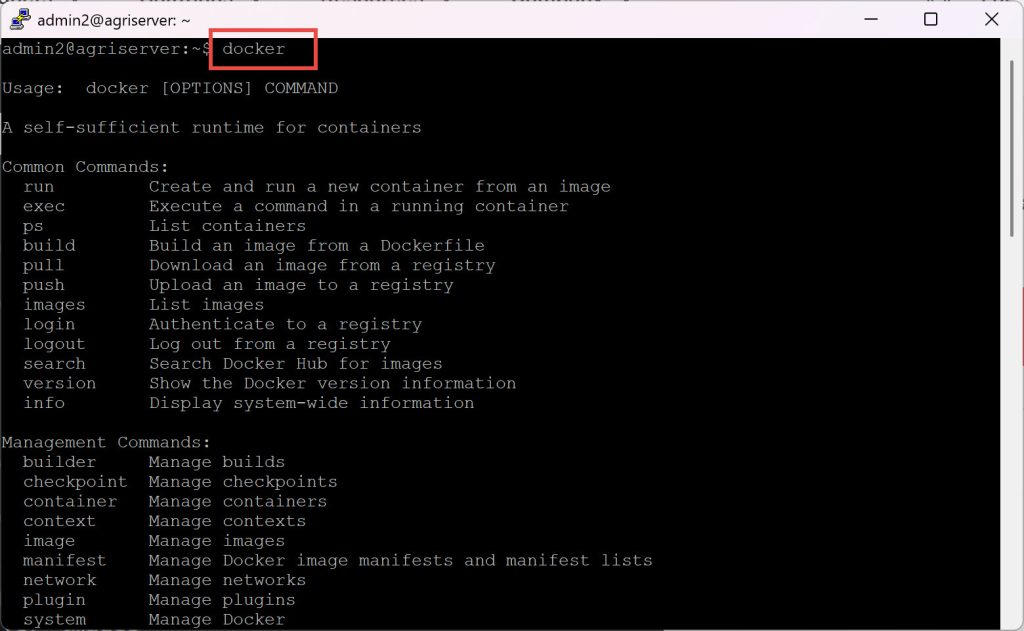
พิมพ์คำสั่ง
docker
-ตรวจสอบ active containers
docker ps
ผลลัพธ์
| CONTAINER ID IMAGE COMMAND CREATED STATUS PORTS NAMES |
docker ps -a
ผลลัพธ์
| CONTAINER ID IMAGE COMMAND CREATED STATUS PORTS NAMES 5f2de59c96ea hello-world “/hello” About a minute ago Exited (0) About a minute ago practical_mahavira 8023fa359430 hello-world “/hello” 6 minutes ago Exited (0) 6 minutes ago hopeful_kirch |
– ตรวจสอบอิมเมจที่มีในระบบ
sudo docker images
ผลลัพธ์
| REPOSITORY TAG IMAGE ID CREATED SIZE hello-world latest 74cc54e27dc4 5 months ago 10.1kB |
– การค้นหาอิมเมจไฟล์
sudo docker search nginx
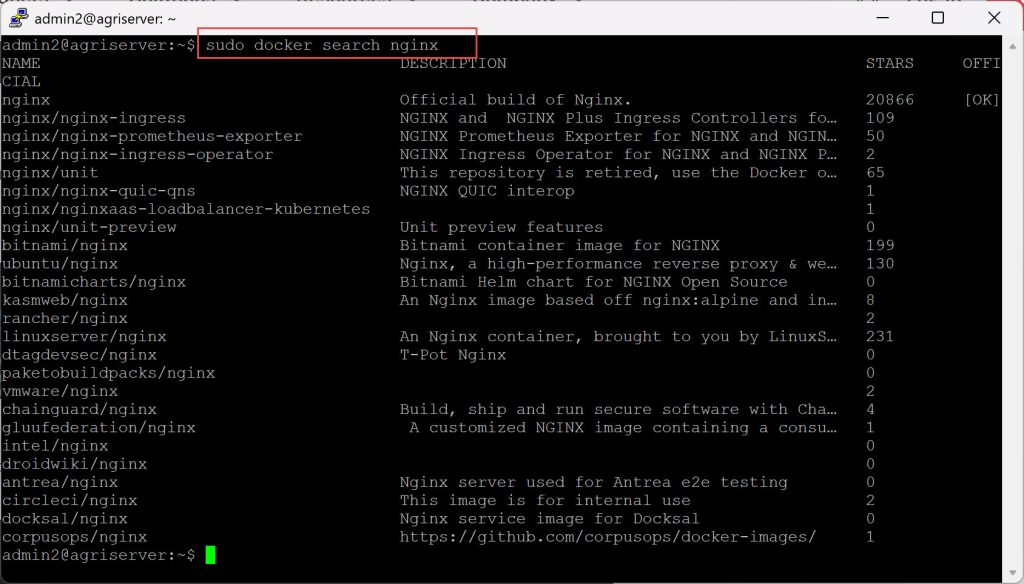
-ดาวน์โหลดอิมเมจ สามารถใช้คำสั่ง docker search
sudo docker pull nginx
ผลลัพธ์
| Using default tag: latest latest: Pulling from library/nginx dad67da3f26b: Pull complete 4eb3a9835b30: Pull complete 021db26e13de: Pull complete 397cc88dcd41: Pull complete 5f4a88bd8474: Pull complete 66467f827546: Pull complete f05e87039331: Pull complete Digest: sha256:dc53c8f25a10f9109190ed5b59bda2d707a3bde0e45857ce9e1efaa32ff9cbc1 Status: Downloaded newer image for nginx:latest docker.io/library/nginx:latest |
ตรวจสอบ
sudo docker images
ผลลัพธ์
| REPOSITORY TAG IMAGE ID CREATED SIZE nginx latest 9a9a9fd723f1 19 hours ago 192MB hello-world latest 74cc54e27dc4 5 months ago 10.1kB |
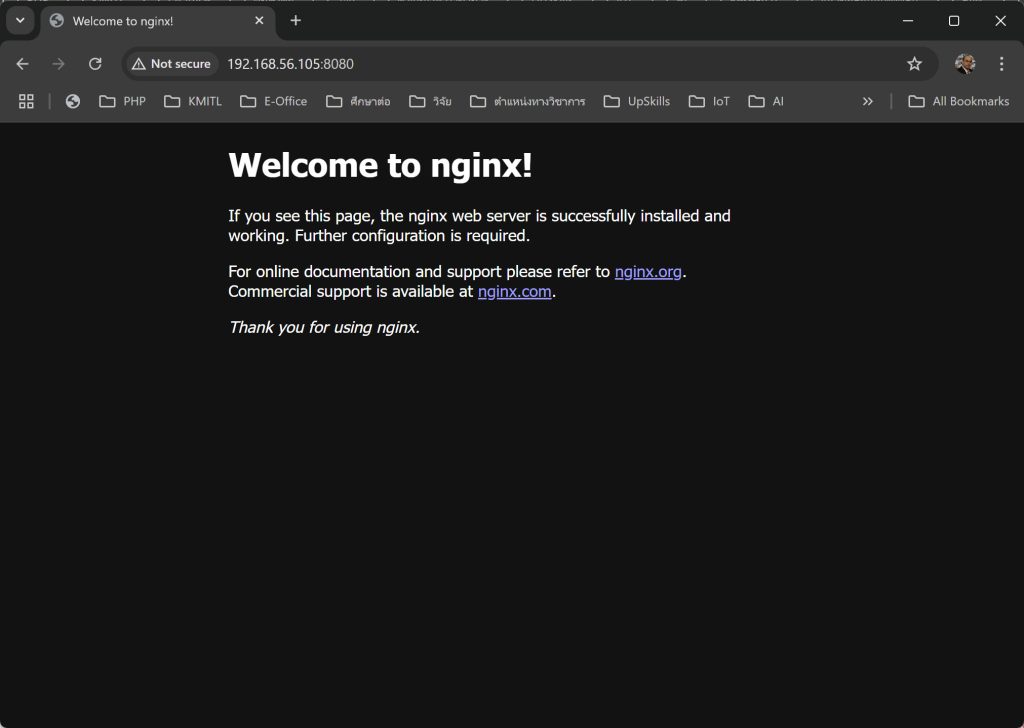
– การใช้งาน Docker Containers (ทดสอบรัน Nginx Web Server ที่พอร์ต 8080)
sudo docker run -d -p 8080:80 nginx
ผลลัพธ์
| 2222f392cd196901efa13411c64a3d98ff9655d46d5f9d329a7581b62812fecb |
-เรียกใช้งานเว็บไซต์
http://server-ip:8080
เช่น
http://192.168.56.105: 8080
*สามารถตรวจสอบหมายเลข IP Address ที่เครื่องด้วยคำสั่ง ip addr
แสดง Web Server ที่ติดตั้งใน Docker
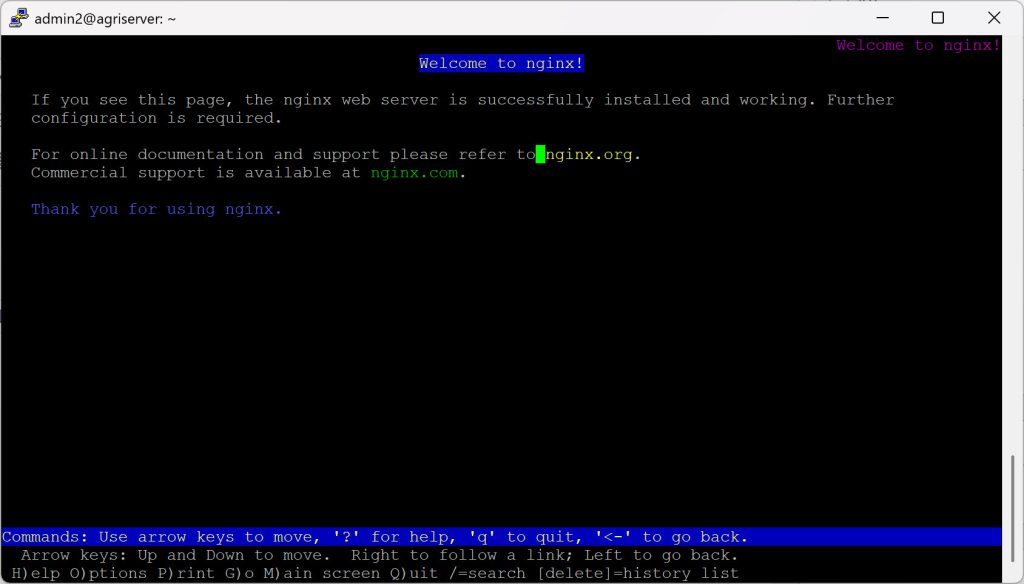
– หรือกรณีต้องการทดสอบผ่านทางเว็บเบราเซอร์บนคอนโซล (ในที่นี้ทดสอบโดยใช้ lynx)
sudo apt install lynx -y
sudo lynx http://127.0.0.1:8080
สรุป
การติดตั้ง Docker บน Ubuntu Server 24.04 สามารถทำได้อย่างรวดเร็วภายในไม่กี่ขั้นตอน ด้วยการใช้ Docker จากแหล่งทางการ ผู้ดูแลระบบสามารถมั่นใจได้ว่าได้ใช้งานซอฟต์แวร์ที่อัปเดตและปลอดภัย การมี Docker บนเซิร์ฟเวอร์ช่วยให้สามารถรันแอปพลิเคชันแบบแยกส่วน เพิ่มความยืดหยุ่น และปรับขนาดได้ง่ายขึ้น เหมาะกับงานด้าน DevOps, Microservices และระบบอัตโนมัติในยุค Cloud-native
—
เขียนและรวบรวมโดย
Dr.Arnut Ruttanatirakul
Technology Lecturer, KMITL
26 June 2025