
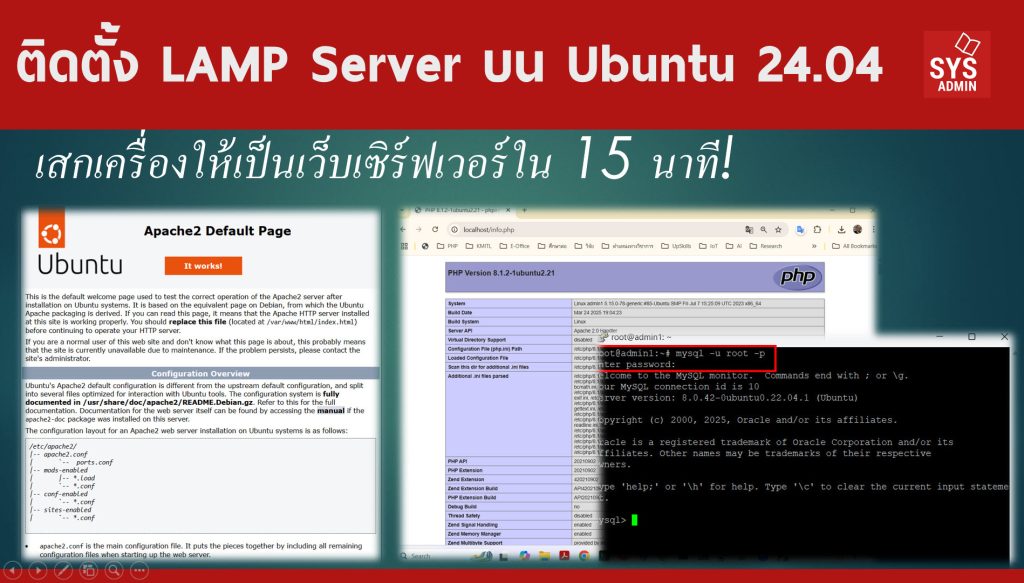
ในยุคที่เว็บไซต์เป็นหัวใจสำคัญของการให้บริการข้อมูลและแอปพลิเคชันบนอินเทอร์เน็ต การมีเครื่อง Web Server สำหรับใช้งานหรือทดสอบในองค์กรถือเป็นสิ่งจำเป็น สำหรับผู้ดูแลระบบหรือผู้พัฒนาเว็บไซต์ที่ใช้ระบบปฏิบัติการลินุกซ์ หนึ่งในสแต็กยอดนิยมก็คือ LAMP ซึ่งย่อมาจาก Linux, Apache, MySQL และ PHP โดยทั้งหมดนี้คือซอฟต์แวร์โอเพนซอร์สที่สามารถติดตั้งได้ฟรี และทำงานร่วมกันอย่างมีประสิทธิภาพ บทความนี้จะพาคุณเรียนรู้วิธีติดตั้ง LAMP บน Ubuntu Server 24.04 LTS เวอร์ชันใหม่ล่าสุด เพื่อให้คุณสามารถเริ่มต้นสร้าง Web Application ได้ทันที
********************************
โดย LAMP ย่อมาจาก
-
Linux (ระบบปฏิบัติการ)
-
Apache (Web Server)
-
MySQL (ฐานข้อมูล)
-
PHP (ภาษาสำหรับประมวลผลฝั่งเซิร์ฟเวอร์)
********************************
การติดตั้ง LAMP Stack บน Ubuntu Server 24.04
1. อัปเดตระบบ
ก่อนเริ่มติดตั้ง แนะนำให้อัปเดตระบบให้ทันสมัย
2. ติดตั้ง Apache2 Web Server
-
เปิดใช้งาน
sudo systemctl enable --now apache2 -
ตรวจสอบสถานะการทำงาน
-
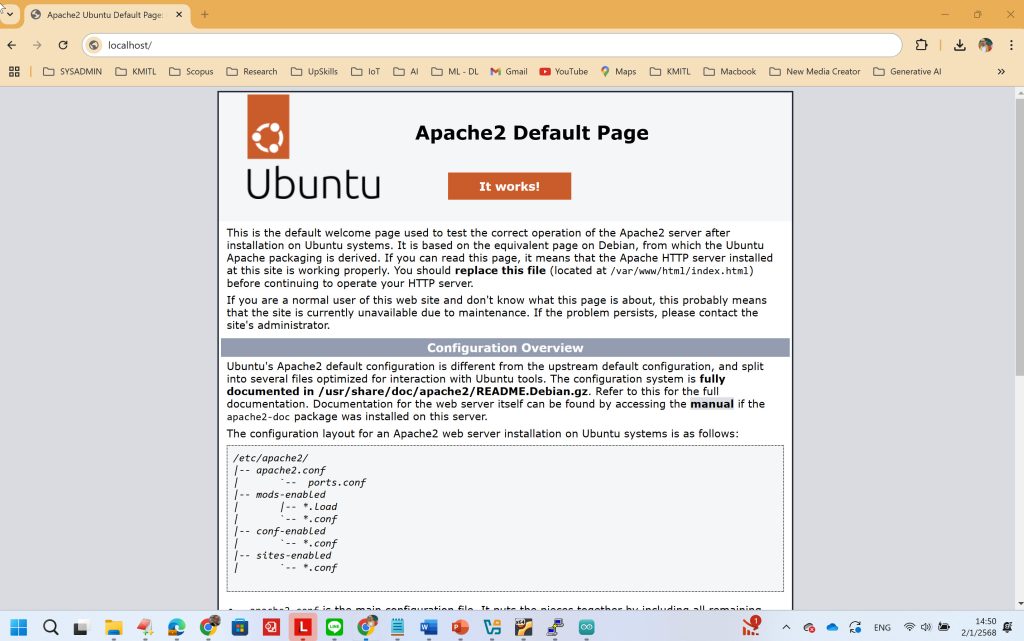
ทดสอบเปิดเว็บเบราว์เซอร์ แล้วเข้าที่
http://<ip-address>หากเห็นหน้า Apache2 Ubuntu Default Page แสดงว่าทำงานเรียบร้อย
ทดสอบคอนฟิก Apache
sudo apache2ctl configtestผลลัพธ์
Syntax OK
|
อนุญาติให้พอร์ต 80, 443 ผ่าน Firewall sudo ufw allow http sudo ufw allow https หรือ sudo ufw allow 'Apache Full'
หรือกรณีใช้พอร์ต |
3. ติดตั้ง MySQL Server
-
รันคำสั่งตั้งค่าความปลอดภัย
|
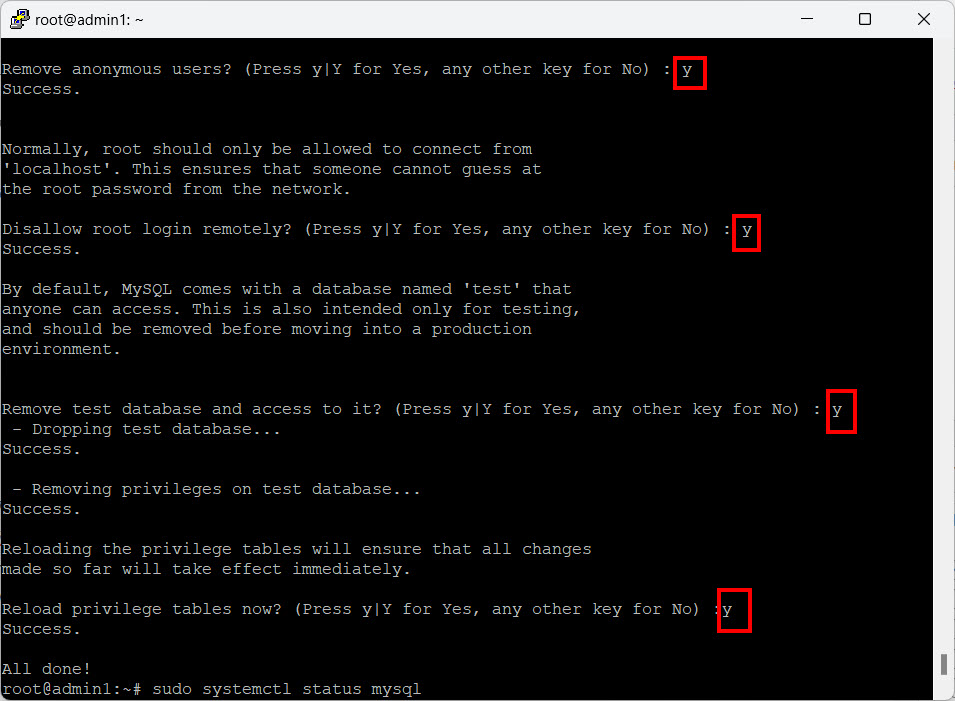
Connecting to MySQL using a blank password. VALIDATE PASSWORD COMPONENT can be used to test passwords Press y|Y for Yes, any other key for No: y # ตอบ y There are three levels of password validation policy: LOW Length >= 8 Please enter 0 = LOW, 1 = MEDIUM and 2 = STRONG: 2 # ความปลอดภัยรหัสผ่าน Remove anonymous users? (Press y|Y for Yes, any other key for No) : y # ลบ anonymous users Normally, root should only be allowed to connect from Disallow root login remotely? (Press y|Y for Yes, any other key for No) : y # ปิดการใช้งานทาง root login By default, MySQL comes with a database named ‘test’ that
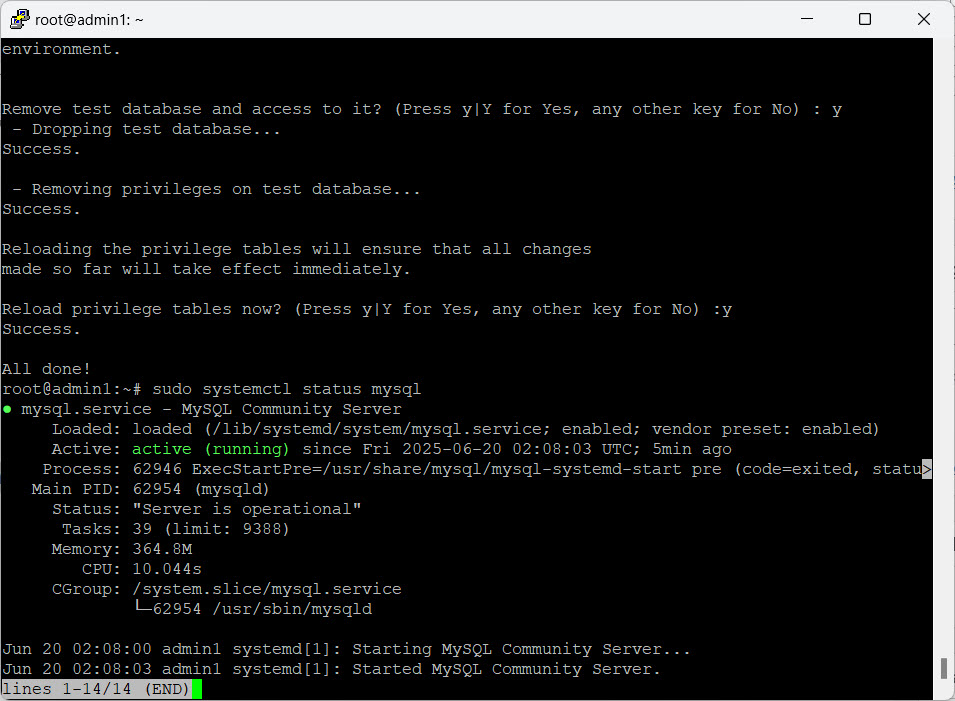
Remove test database and access to it? (Press y|Y for Yes, any other key for No) : y # ลบฐานข้อมูลตัวอย่าง – Removing privileges on test database… Reloading the privilege tables will ensure that all changes Reload privilege tables now? (Press y|Y for Yes, any other key for No) : y #เรียกใช้งานทันที Success. All done! |
-
ตรวจสอบสถานะ
| ● mysql.service – MySQL Community Server Loaded: loaded (/lib/systemd/system/mysql.service; enabled; vendor preset: enabled) Active: active (running) since Fri 2025-06-20 02:08:03 UTC; 5min ago Process: 62946 ExecStartPre=/usr/share/mysql/mysql-systemd-start pre (code=exited, statu> Main PID: 62954 (mysqld) Status: “Server is operational” Tasks: 39 (limit: 9388) Memory: 364.8M CPU: 10.044s CGroup: /system.slice/mysql.service └─62954 /usr/sbin/mysqld |
sudo mysql
mysql>
- กำหนดรหัสผ่านโดยใช้คำสั่ง alter (กำหนดรหัสผ่าน Database Admin ที่ต้องการ เช่น Strong@@password123)
mysql > alter user ‘root’@’localhost’ IDENTIFIED BY ‘Strong@@password123‘;
- กำหนดให้สามารถใช้สิทธิ์ตอนนี้
mysql> FLUSH PRIVILEGES;
- ออกจาก Console
mysql > EXIT
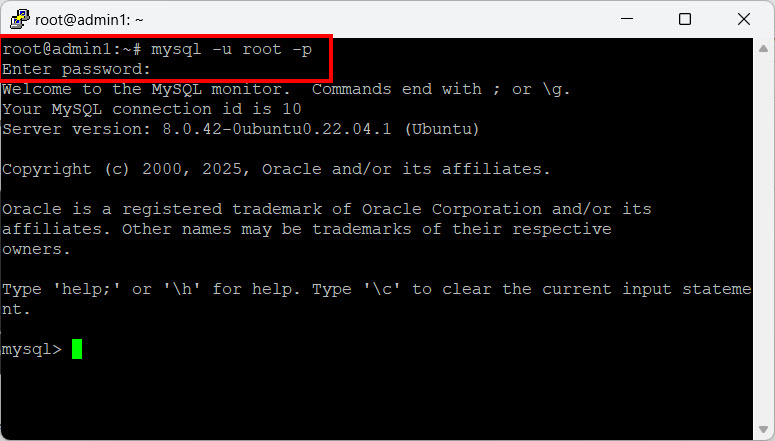
- ทดสอบเข้าใช้งาน MySQL (เข้าใช้งานครั้งแรกไม่ต้องใส่รหัสผ่าน ให้กดปุ่ม Enter)
sudo mysql -u root -p
Enter password: ****** รหัสผ่าน
ผลลัพธ์
|
Welcome to the MySQL monitor. Commands end with ; or \g. Copyright (c) 2000, 2025, Oracle and/or its affiliates. Oracle is a registered trademark of Oracle Corporation and/or its Type ‘help;’ or ‘\h’ for help. Type ‘\c’ to clear the current input statement. mysql> |
+——————–+
| Database |
+——————–+
| information_schema |
| mysql |
| performance_schema |
| sys |
+——————–+
4 rows in set (0.01 sec)
– ทดสอบสร้างฐานข้อมูล
mysql > CREATE database AgritechDB;
mysql> show databases;
+——————–+
| Database |
+——————–+
| AgritechDB |
| information_schema |
| mysql |
| performance_schema |
| sys |
+——————–+
5 rows in set (0.02 sec)
– กรณีต้องการสร้างผู้ใช้งานฐานข้อมูล สามารถใช้คำสั่ง user พร้อมกำหนดสิทธิ์
mysql > CREATE USER ‘dbadmin’@’localhost’ IDENTIFIED BY ‘Strong@@password123’;
mysql > FLUSH PRIVILEGES;
4. ติดตั้ง PHP และโมดูลที่จำเป็น
-
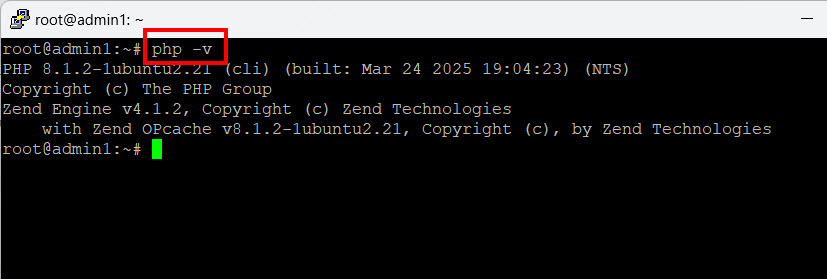
ตรวจสอบเวอร์ชันภาษา PHP
php -v
5. ทดสอบ PHP
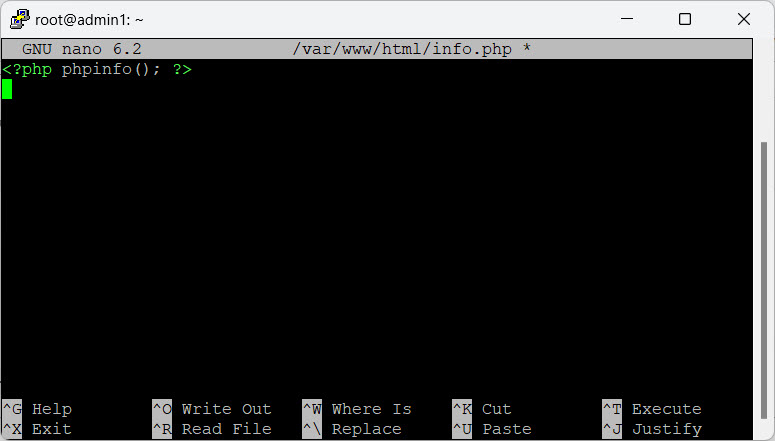
สร้างไฟล์ทดสอบใน /var/www/html/
ใส่โค้ด
phpinfo();
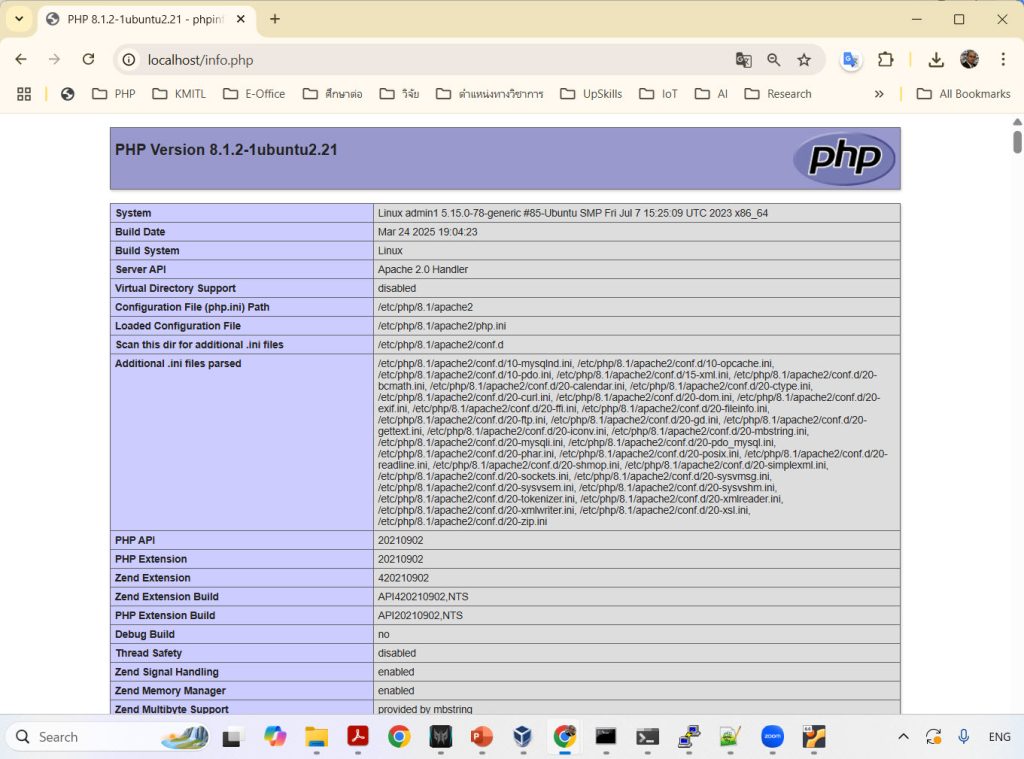
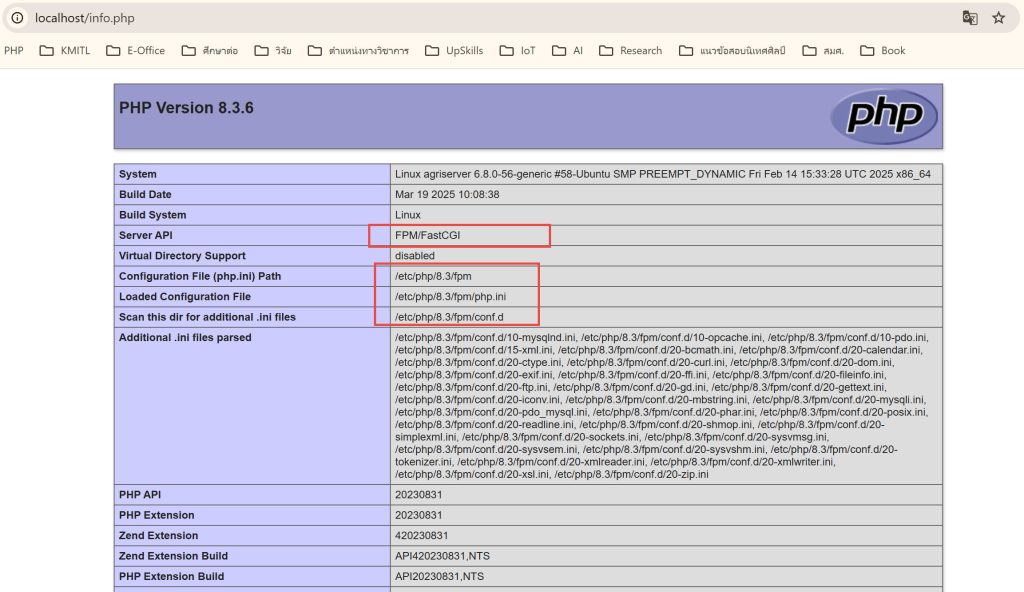
บันทึกแล้วเปิดเบราว์เซอร์ไปที่ http://<ip-address>/info.php หากแสดงหน้าข้อมูล PHP แสดงว่าติดตั้งสำเร็จ
การตั้งค่า (Optional)
-
เปิดใช้งาน mod_rewrite (สำหรับ URL Rewrite)
-
ตั้ง Timezone และค่าอื่นใน
php.ini
เปลี่ยน timezone เป็น
Asia/Bangkok
[Date]
; Defines the default timezone used by the date functions
; https://php.net/date.timezone
date.timezone = Asia/Bangkokเปิด
file_uploads = On
; https://php.net/file-uploads
file_uploads = Onหมายเหตุ: ใน Ubuntu 24.04 PHP เริ่มต้นคือเวอร์ชัน 8.3
เพิ่มความเร็วในการรันเว็บที่เขียนจากภาษาพีเฮสพีด้วย PHP-FPM สำหรับ Apache [Optional]
| PHP-FPM (ย่อมาจาก PHP FastCGI Process Manager) คือกลไกการประมวลผล PHP แบบหนึ่งที่มีประสิทธิภาพสูง ออกแบบมาเพื่อปรับปรุงการทำงานของ PHP ในระบบเซิร์ฟเวอร์ โดยเฉพาะกับเว็บไซต์ที่มีการโหลดสูง หรือใช้ระบบที่ต้องการเสถียรภาพและประสิทธิภาพสูง เช่น Nginx หรือ Apache ที่ใช้กับ FastCGI โดยทั่วไปแล้ว เมื่อเว็บเซิร์ฟเวอร์ (เช่น Nginx) ต้องประมวลผลไฟล์ .php มันจะไม่ทำเองโดยตรง แต่จะส่งคำขอไปยัง PHP-FPM ผ่าน FastCGI protocol เพื่อให้ PHP-FPM ประมวลผล แล้วส่งผลลัพธ์กลับไปยังเว็บเซิร์ฟเวอร์
ข้อดีของ PHP-FPM
|
การติดตั้ง PHP-FPM
sudo apt install php8.3-fpm -y
เปิดใช้งานโมดูล proxy_fcgi และ setenvif
sudo a2enmod proxy_fcgi setenvif
ผลลัพธ์
| Considering dependency proxy for proxy_fcgi: Enabling module proxy. Enabling module proxy_fcgi. Module setenvif already enabled To activate the new configuration, you need to run: systemctl restart apache2 |
- สั่งเปิดใช้งาน Apache php8.3-fpm
sudo a2enconf php8.3-fpmผลลัพธ์
|
- สั่งรีสต๊าท Apache
sudo systemctl restart apache2
- สั่งเปิดใช้ PHP-FPM
sudo systemctl enable –now php8.3-fpm - ตรวจสอบสถานะ PHP-FPM
sudo systemctl status php8.3-fpmผลลัพธ์
- php8.3-fpm.service – The PHP 8.3 FastCGI Process Manager
Loaded: loaded (/usr/lib/systemd/system/php8.3-fpm.service; enabled; preset: enabled)
Active: active (running) since Tue 2025-06-24 05:23:57 UTC; 7min ago
Docs: man:php-fpm8.3(8)
Main PID: 45511 (php-fpm8.3)
Status: “Processes active: 0, idle: 2, Requests: 0, slow: 0, Traffic: 0req/sec”
Tasks: 3 (limit: 9441)
Memory: 10.1M (peak: 10.6M)
CPU: 158ms
CGroup: /system.slice/php8.3-fpm.service
├─45511 “php-fpm: master process (/etc/php/8.3/fpm/php-fpm.conf)”
├─45513 “php-fpm: pool www”
└─45514 “php-fpm: pool www”
- php8.3-fpm.service – The PHP 8.3 FastCGI Process Manager
แสดง PHP FastCGI ที่ติดตั้งเสร็จแล้ว
บทสรุป
การติดตั้ง LAMP Server บน Ubuntu Server 24.04 เป็นขั้นตอนพื้นฐานที่ช่วยให้ผู้ดูแลระบบและนักพัฒนาสามารถเริ่มต้นพัฒนาเว็บแอปพลิเคชันได้อย่างรวดเร็ว ด้วยเพียงไม่กี่คำสั่งก็สามารถเตรียมความพร้อมสำหรับระบบเว็บไซต์ที่ใช้งานได้จริง โดย Ubuntu 24.04 มาพร้อมกับความปลอดภัยที่ดีขึ้นและประสิทธิภาพที่ดีกว่าเวอร์ชันก่อนหน้า ทำให้ LAMP Stack บนเวอร์ชันนี้เป็นทางเลือกที่เหมาะสมสำหรับทั้งการใช้งานในองค์กรและการเรียนรู้
—
เขียนและรวบรวมโดย
Dr.Arnut Ruttanatirakul
Technology Lecturer, KMITL
20 June 2025