
การตั้งค่า Multiple IP Address บนระบบ Ubuntu Server ที่ใช้ Netplan เป็นวิธีการกำหนดให้ Network Interface เดียวสามารถมี IP Address ได้หลายหมายเลข เหมาะสำหรับงานเช่น
- การให้บริการหลายเว็บไซต์ (Virtual Host)
- การทำ Reverse Proxy / Load Balancer
- การใช้หลาย Service บนเครื่องเดียว เช่น Web Server, API Server
- การทำระบบ Lab หรือ Server สำหรับการเรียนการสอน
ด้านล่างเป็นแนวทางการตั้งค่าที่สามารถนำไปใช้งานได้จริง
1. ตรวจสอบชื่อ Network Interface
ก่อนเริ่มตั้งค่า ให้ตรวจสอบชื่อ interface ของเครื่อง
2. เปิดไฟล์ Netplan Configuration
ไฟล์ config มักอยู่ใน directory
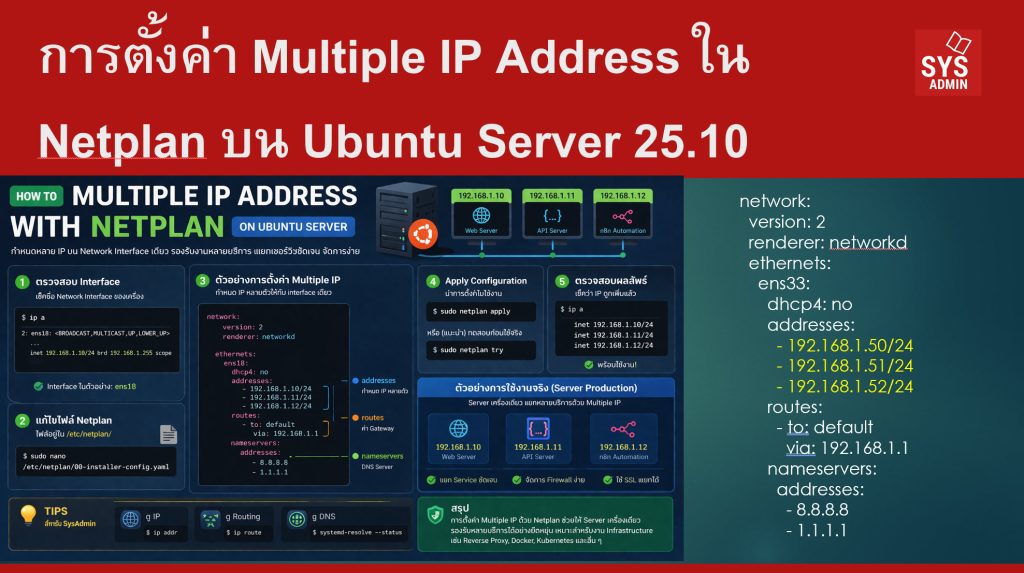
3. ตัวอย่างการตั้งค่า Multiple IP
ตัวอย่างกำหนด IP หลายตัวให้กับ interface เดียว
|
network:
version: 2 ethernets: |
คำอธิบาย
| Parameter | ความหมาย |
|---|---|
| addresses | กำหนด IP หลายตัว |
| routes | Gateway |
| nameservers | DNS |
4. Apply Configuration
หลังแก้ไขไฟล์ ให้ Apply config
5. ตรวจสอบผลลัพธ์
ตรวจสอบว่า IP ถูกเพิ่มหรือไม่
inet 192.168.1.12/24
6. ตัวอย่างใช้งานจริง (Server Production)
ตัวอย่าง Server ที่มีหลาย Service
| Service | IP |
|---|---|
| Web Server | 192.168.1.10 |
| API Server | 192.168.1.11 |
| n8n Automation | 192.168.1.12 |
ข้อดี
- แยก service ได้ชัดเจน
- ใช้ firewall control ง่าย
- ใช้ SSL certificate แยกได้
7. ตัวอย่าง Advanced (Public IP)
หาก Server มี Public IP หลายตัว เช่น
161.246.67.27
– 161.246.67.26/26
– 161.246.67.27/26
ตัวอย่าง Apache
</VirtualHost>
8. Tips สำหรับ SysAdmin
คำสั่งตรวจสอบ Network
ดู IP
สรุป
การตั้งค่า Multiple IP Address ด้วย Netplan มีข้อดีสำคัญคือ
- ใช้ Server เครื่องเดียวทำหลาย Service
- จัดการ Network ได้ยืดหยุ่น
- รองรับงาน Infrastructure เช่น Reverse Proxy, Docker, Kubernetes
จึงเป็นเทคนิคพื้นฐานที่ System Administrator และ DevOps ควรใช้งานได้คล่องในระบบ Ubuntu Server